
Our original 30 year old ports were really looking pretty shabby and a couple of them had begun to leak. We did some temporary caulking, which I don't like to do, but it was obvious that it was time to replace them. After a lot of research, we found some very good looking stainless steel ports at New Found Metals and ordered the 5X12 Stainless with screens and all of the needed materials for installation. We have received a lot of positive feedback from other boaters that have installed their ports and were very happy. The price was pretty good, and the ports arrived in short order. It was time to start the replacement process.

Step 1. Removing the old ports is always a messy process. Ours had a teak trim ring on the outside that came off in pieces. It is hard to tell in the photo, but we used white duct tape around the trim ring so we could get a wide putty knife behind it and not damage the paint in the process. Beach House has had the cabin sides painted with AwlGrip so it is not just gel-coat.


Step 2. Next, the inside main section of the port had to come out. This is the worst one on the boat and also the one that began to leak again. (Not to mention the fact that it looked horrible.) That is why we started here. The screws came out fairly easily, but since the interior plywood is pretty thin, we had to be very careful to not damage the surrounding wood when pulling this off.

The wide putty knife was used again, and slowly and carefully, we coaxed it off without too much of the veneer on the plywood coming with it. It was actually surprising that it came off so easily. Next, the old caulking had to be gently removed and the wood repaired.


Step 3. There were some spaces and gaps in the plywood core between the outer fiberglass and the interior plywood. We filled the space and gaps with an expandable water resistant foam. Once the foam had set, it was trimmed even with the old opening.

Step 4. We would need to make a template since the new ports were a different shape than the old ones. The new ports have a drain built in, and the corners are shaped slightly different. The overall size of the new ports is very close to the size of the old ones. We took a heavy folder and laid the trim ring on top. With a rubber mallet we tapped all around the trim ring and made an impression of the hub marks. This is where the fasteners will come through from the inside.

With the trim ring still in place, the ring is traced on the template materials. You can trace both the inside and outside of the trim ring, or do as we did, and only trim the inside. If you do this, take care to be sure the top of your template material and the trim ring are in perfect parallel. With the trim ring removed, trace out the locations of the hub marks. These will be used to drill your holes. Once the actual trim ring is traced, the inside perimeter will need to be offset about 3/16 of an inch as will the hub marks.


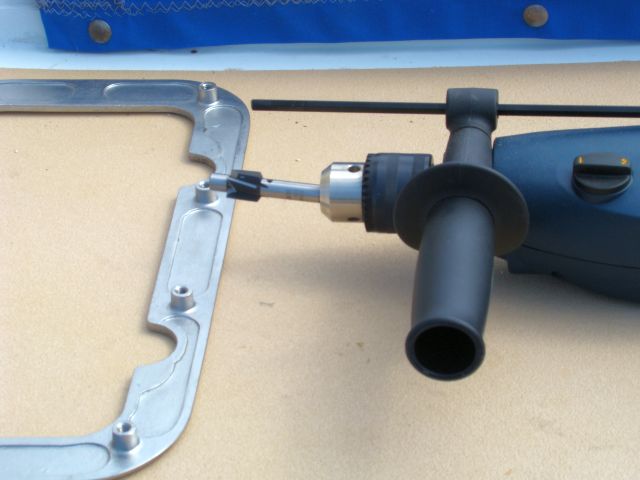
Step 5. Once the template is finished, it needs to be secured to the outside of the cabin. Take care that it is flat and will not move around as you trace it on the cabin side and also that it is lined up properly. You can take measurements from the surrounding area, or, as we did, use the top inside edge of the template and the top edge of the old cutout for alignment. The area for the drains and the minor adjustments for the corners were marked with a felt tip pen and the template removed. The minor cutting to make the new size fit was made easy with our new Dremel Trio. I have a feeling this is going to be one of my favorite tools. The holes for the fasteners are also drilled using a drill guide supplied by New Found Metals. The drill guide assures that the holes are drilled at the correct angle so that the outer trim ring and the port itself will line up perfectly for the fasteners.

Step 6. Once the opening was cut, we did a dry fit to make sure everything was going as planned. So far so good, and it was time to seal up the core between the outside fiberglass cabin side and the interior wood. This is a messy process so we make sure the inside is covered with duct tape to keep the epoxy off the interior wood and the outside is protected with heavy paper taped in place. The core is coated using West System Six10. A two inch strip of fiberglass tape wetted with West System is carefully laid around the opening to completely seal it and add strength. This is the same process we used in repairing the windows.

The one inch fiberglass strip should be trimmed with a utility knife along the edge of the opening, just before the epoxy kicks off completely. This is much easier than trying to cut and grind after the epoxy has hardened. Once the epoxy has set, it needs a thorough sanding and wiping down with water and a 3M pad. This removes the blush from the epoxy which can prevent anything from sticking to it and get the opening ready to accept the bedding compounds.
Step 7. The holes on the outside will also need to be counter bored about 1/2 inch to accept the trim ring. We also purchased the counter bore from Newfound Metals and it is of good quality. Be careful not to let the counter bore get away from you.

Step 8. The stainless trim ring and the port itself need a good cleaning with Acetone. This removes any dirt and residue left on the ports from the manufacturing process and assures that the bedding material will stick and seal the ports.


Step 10. The bedding process is probably the most important step in the entire installation. Remember that beside them being ugly, they leaked and we did not want to go through this entire process only to have them leak again and start over. We did one final dry fit before applying the bedding compound. For bedding ports, our preference has always been butyl tape. The stuff is tenacious, lasts forever and is really really sticky. It can be found at most any RV supply store or it can be ordered with the ports. Newfound Metals recommends the ports be sealed really well on the inside and outside. We prefer minimal sealing on the inside and serious sealing on the outside. We want to keep the water on the outside of the boat. A single bead of the butyl tape around the inside of the port is all we used. The space under the drain portion of the port needs a few extra layers. This is more to hold the port in place than it is for bedding purposes.


Step 11. The main section of the port needs to be clamped into place. It is very important that the port line up properly with the holes drilled for the fasteners and the outer trim ring. The port and trim ring should be lined up in place, the port clamped and the trim ring removed. Do this before you put the butyl tape on the trim ring. Tighten down on the clamps. The strip of butyl tape that was placed on the post should squeeze into the opening and allow the clamps to be removed for a short period of time to position the trim ring. But there is a little more that needs to be done first. Once the port is positioned where it should be, the space between the port and the opening in the cabin side has to be filled in with butyl tape. We added two complete rings. Running a ring around the entire port by using the paper that the tape comes on and a plastic handle from putty knife, we forced the butyl tape into the opening. Unfortunately, I was too busy with the project to take a photo. At a minimum, two rings should be forced into the opening. We pushed it in as far as we could, being careful to not leave so much along the outer edge of the port that when we installed the trim ring, it would squeeze out all over the port and ring.

Step 12. With the butyl tape added to the hubs wrapped with butyl tape, the rest of the trim ring needs to be well caulked. For this, we used 3M 4000 UV just in case we will ever have to remove the trim ring in the future. I can't caution enough on the butyl tape. Use enough to completely seal everything, but not so much that it will squeeze out from behind. The stuff is really sticky and hard to clean off.
Step 13. Remove the clamps and bolt the mainframe of the port and the trim ring together. We put a dab of 4000 on the beginning of the threads and a dab of Tef-Gel just under the bolt head. This seals the threads in the trim ring and keeps the head of the fastener from seizing when it comes down to tightening. We tighten down each fastener a little at a time, going round and round until the port and trim ring are tight. We try not to over tighten so that all of the bedding will squeeze out. There should be enough bedding to form a gasket.

Step 14. The 3M 4000 should be applied so that it DOES squeeze out from all around the trim ring. For that, we tape around the ring and the mainframe flange to make clean up easier. But the excess caulk needs to be removed right away before it dries. We use a caulking knife to remove most of it and then Acetone and lots of rags for the final clean up. If any of the butyl tape did squeeze out, it can be cleaned up with metal polish or car wax.
Step 15. Give the entire stainless mainframe and trim ring a good cleaning with a quality metal polish. The finished port will look fantastic.

The interior wood had suffered some damage and the teak had been water-stained from the leaks. No matter what we did, it was not going to look nice, and with the new port, we did want it to look good. Since this area is a storage shelf and in a corner, we decided to try and paint just this area and see how it would look. It could not be any worse. We were very pleased in how the paint turned out, and except for some wiring that needs to be covered, we are declaring this project a success. So, one down and four more to go.


Excellent! Your most detailed entry yet.
ReplyDeleteholiday
Much appreciated. I guess I will get better at this as time goes on, or as I have more time to work on the postings. Chuck
ReplyDeleteBlogging is a full time job! Who would have guessed that writing a note and adding pictures could be so time consuming? All for a 5 minute read.
ReplyDeleteThanks for your energy in putting your efforts to "print".
holiday
Hope you guys are well. Miss reading your posts!
ReplyDeleteHappy Holidays from George and Donna
Thanks, We will be doing some posting this weekend, but unfortunately work commitments and weather have slowed things down quite a bit for us. So don't give up. The winter will slow down the project too, but if it is a mild winter we hope to get some big ones done. Chuck
ReplyDeleteChuck, Thank you very much for the detailed report on how the replacement of a port should be done. My old Marine Trader will look new again. Mike Liles
ReplyDeleteGlad we could help Mike. The ports have been in for quite a while now and we really like them. They look great too. Good luck with your projects. Chuck
Delete