The teak brows were probably the least attractive pieces of wood on the boat and a pain to keep up. All of the screws that secured them to the sides of the cabin have been a source of leaks that we knew we needed to deal with soon. We did some caulking early on to stop the water intrusion, but caulking is just the proverbial band-aid, and more drastic action was necessary to resolve it once and for all. Just as with the flybridge, removal has been my choice since day one and the time has come to tackle the project and check it off the list.
The teak brows wrap around the forward and aft section of the cabin. The brows around the flybridge are a thing of the past as we noted in the previous post. Removing these and saving them was not going to be easy, and since I had no intentions of putting them back, they came off in pieces. Some of them were caulked really well when the boat was built, but many were barely caulked at all, and there in lies the leak problem.
With the brows removed, it was easy to see that water and dirt had been getting behind them for years. And in a 30-year-old boat, that's not a good thing.
The next step was to clean it all up, sand off the heavy residue and open up the screw holes a bit with a drill countersink. The cabin sides had been painted with AwlGrip by the previous owner, but of course not under the teak. This was the original gelcoat, so the surrounding area had several coats of primer and paint, leaving an indentation where the strips came off.
The screw holes were filled with a thickened epoxy mix, West System being my preference. It's important to be sure that the epoxy mixture gets deep within the old screw holes. This needs to sit for at least 24 hours to give the epoxy plenty of time to set up properly.
The epoxy is then sanded smooth, and the indentation left by the removal of the teak is filled by applying about 3 to 4 coats of white 545 primer. Once the primer is completely dry, everything is sanded smooth with my orbital sander and 220 grit sandpaper.
Prior to painting, all the surfaces need to be wiped down with a tack cloth to remove dust and then with AwlGrip Surface Cleaner. I like to wipe it down at least twice and sometime three times before painting using two cloths, one to wipe on the cleaner and one to wipe the cleaner off. This assures that all wax and residue has been removed and also gets off the last of the dust.
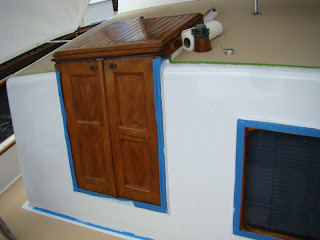
Next step is to tape off all of the adjoining edges that I don't want to get paint on. Some places will get a single strip of tape while others will get a double-wide treatment. The paint is going on with a roller so there is not much splatter. The varnished wood and any other surfaces I am concerned with will get 3M delicate removal tape. Around the new non-skid material, I used Frog Tape to keep the paint from crawling under it, a common problem.
With the surface prepped and ready for paint, it's time to mix the topcoat. Just as before, we are using AwlGrip Cloud White. The paint is a three part, topcoat, converter and brushing thinner. And I add a few drops of drying accelerator so the paint will dry before the sun sets and the heavy dew here in south Florida ruins all of my hard work. The paint mixture needs to sit for about 20 minutes and cook before applying. I use small foam rollers to apply the paint which often requires no tipping and the results gives us a finish that looks like it has been applied with a spray gun.
The cabin sides will get only two coats of paint instead of our usual three coats. It has been painted previously so the third coat is not really needed. As soon as the paint is dry to the touch, all of the tape is carefully removed. I don't like to leave it on any longer than necessary since the longer it's on, the harder it is to get off.
With all of the nice fresh paint on the cabin sides, the boat is looking almost like new. But with the brows gone, it looks a little stark and really does need something to dress it up again.
So we decided that a nice matching teal strip would be just the little something the project needed. The stripe was added in the exact same place that the teak brows had occupied before. It really is a nice touch.
The aft end of the cabin got the same treatment and soon we were getting lots of compliments from our neighbors and folks walking the dock. Our neighbors might just be glad that all of the sanding and painting is finished.
We're really pleased with how all of this turned out and this does cut down on the amount of teak we have to maintain and the extra caulking needed on a regular basis. Not to mention the dozens of holes for water intrusion. Drop us a line in the comments section and let us know what you think.


Hi Chuck and Susan. I have never posted on your blog before, but I do follow it from time to time, and would like to let you know that I am living vicariously through you guys. I am a 24 year old up here in NJ, waiting for my day to come when I can buy a fixer-upper Marine Trader Trawler to weekend on. Your beautiful boat and crafty ingenuity is inspiring and I would like to let you know that I truly appreciate your blog. You seem like very nice people. I love the teal stripe! PS-- I am also on the hunt for my "Susan" as well!
ReplyDeleteThanks TK and glad we can be of service. At 24 I was still looking for that boat and had not found my Susan yet either. Don't give up because she is out there somewhere and believe me when I say that she will show up when you need her. You just need to know where and when to look. I learned a long time ago to let life happen and just be ready when opportunity presents itself. Don't try to force it. We hope everything works out for you. Chuck and Susan
ReplyDeleteGood job. The spripe looks nice. Our 1978 MT 36 still has the teak brow. We have a leak over our berth. I am wondering if that is where it is coming from. Where in south Florida are you? We are in Tavernier.
ReplyDeleteThanks. We had three or four leaks in the forward cabin and a couple in the aft cabin. ALL of them were from the screws in the brows. caulking the strips helped for a while but eventually they started again. Some heavy rains the last few days and no leaks. We're in Port Of The Islands just south of Naples and Marco Island. We will be heading through the Keys when we shove off in November. Chuck
ReplyDeleteSounds good, I probably need to investigate ours a little more throughly. When you come through the keys look us up. We will be here till at least January. We have that much work to do to the boat. We have a blog at www.mikeandsharondunsworth@blogspot.com it you get really bored.
ReplyDeleteHello,
ReplyDeleteThis is my first blog. Amazingly, We are finishing the deal on our first trawler and first boat in 20 years! Also, it just happens to be a 1980 Marine trader, 34' dual cabin. what a great cooincidence.
I truly appreciate your postings and plan to follow much of your advice.
Thank you immensely.
Mike & Linda from MA
Congratulations. We hope you will enjoy the boat as much as we have... or will. It has been a lot of work and we have more to do. But when it's done the adventure can began. Let us know if we can answer any questions for you. Chuck
DeleteChuck, found you through A Whale's Tale blog. About to tackle the same job on our '84 Endeavour 33 sloop. Looking forward to hearing more from you and Susan from what Neal Boortz calls "paradise" in Florida.
DeleteThanks. A Whale's Tale is a great blog. We can't wait until our posts cover our cruising again rather than projects. Right now it looks like about 4 more months. Until then, we'll keep the projects coming.
Delete